Remembering the Kanji Stroke Order for Handwriting Japanese Letters

Ah, kanji. You need to know 2,136 of them to read the newspaper, but it’s not enough to just learn them. Remembering the kanji stroke order for handwriting Japanese letters is critical to getting these complex little characters just right.
I introduced the concept of stroke order for handwriting Japanese letters in this article, so read that first if you haven’t already. Basically, there are precise criteria to follow for stroke order, similar to those used in calligraphy, to ensure consistency and clarity in writing. This article contains 9 important rules that will help you with remembering the kanji stroke order when handwriting Japanese letters.
Remembering the Kanji Stroke Order: Just Follow the Rules
Like the kana, each kanji is formed by following a specific order of strokes, which is based on traditional calligraphy and standardized writing systems.
A really good way to learn how to write almost all kanji is to follow a set of guidelines. Sure, there are a few exceptions, but it's much simpler than trying to remember the stroke order for thousands of kanji individually. As I mentioned in the last stroke order article, most Japanese characters are written from left to right and top to bottom, with horizontal lines going left to right and vertical lines going from top to bottom. Take the character "人" ("hito" or "jin"), for instance. This character usually means "person" or "human." Although it's made up of just two strokes, following the usual rules, you have to first write the left line from top to bottom, then the right line from top to bottom.
With that in mind, here are the nine main rules to keep in mind when handwriting Japanese letters that are more complex.
Handwriting Japanese Letters Rule 1: Start With Horizontals
Most of the time, it's best to tackle the horizontal lines first before moving on to the vertical ones. If you've got more than one horizontal line, begin with the ones closest to the upper left corner. That's usually where you'll start your first stroke when writing a kanji.
Handwriting Japanese Letters Rule 2: Write the Center Vertical Stroke Before Outside Strokes
For Japanese characters containing a vertical line followed by two diagonals, start with the vertical line first, especially if it's surrounded by symmetrical characters. Take the kanji character for "tree," 木 (ki or moku). First, you write the horizontal line, then the vertical one, and then the two diagonal lines from left to right.
The same goes for the Japanese character 水 (mizu or sui), which means "water." The vertical line comes first, followed by the left portion of the character and then the right.
Handwriting Japanese Letters Rule 3: Boxes Are Three Strokes (not four)
The "mouth" kanji, 口 (kuchi or kou), comes up a lot on its own and as a component of other Japanese characters. There are just three strokes in this kanji. Don't make the mistake of writing it with four strokes, thinking each side needs one stroke. Remembering the Kanji stroke order for this character is important because it impacts other stroke-order rules too.
口 is an exception to the rule of starting with a horizontal line first (remember what we discussed earlier?). Start with the leftmost vertical line instead of a horizontal one. The top horizontal stroke comes next, but instead of stopping there, it turns at a right angle to continue downwards, all in one stroke. The final stroke that completes the box is always the bottom of the box, a horizontal one from the left. It's important to remember this because it's necessary for our next rule.
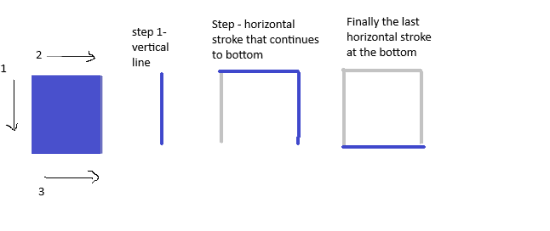
To review, here are the three strokes in 口:
Left vertical line (drawn top to bottom)
Angle starting from top of box down to bottom right corner
Bottom horizontal line (drawn left to right).
Handwriting Japanese Letters Rule 4: Boxed Kanji End with the Bottom of the Box
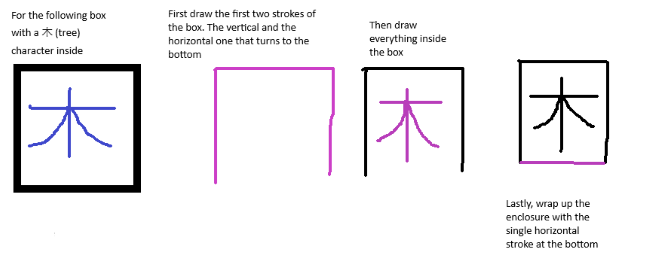
You'll come across many kanji where a large square encloses something, like 回 (round), 園 (park), and 国 (country). For all these, start with the three sides of the enclosure—that's the first two strokes of the mouth. Then, complete everything inside. Only once you're done with the inside do you wrap up the enclosure with a single horizontal stroke at the bottom.
Excuse my wobbly lines in these images–clearly I didn’t do these on Photoshop, but you get the point.
This applies even to other versions of the box, including those that don't close at the bottom, like 同 (what), 可 (can (verb)), 月 (moon/flesh), and 用 (use).Whenever you encounter boxes or enclosures like these, it's best to start with the enclosure first. Enclose as much of the three sides as possible, then move on to the inner parts.
As you continue to grasp the pattern of the full enclosure, it becomes easier to handle other types of enclosures too.
Handwriting Japanese Letters Rule 5: The Motion Exception
You'll notice a box-like wavy line with a single short stroke over the top in the bottom left part of many kanji, like 道 (road )and 近 (near). This often occurs in Japanese characters related to movement and distance.
The motion radical is an exception to the boxed-in rule because it occurs last. For example, the character 道 contains the motion radical and the kanji 首 (neck). (Why? Beats me. Japanese characters make no sense a lot of the time). Stroke order dictates you write 首 first, then add the motion radical, starting with the top short stroke, then the vertical stroke, then finally the horizontal stroke.
Handwriting Japanese Letters Rule 6: Prioritize Right-to-Left Diagonals over Left-to-Right Diagonals
The general rule of thumb for diagonal strokes is right to left first, then left to right. To write Japanese letters with multiple sets of diagonals, follow the general rules and start near the top-left.
Let’s use 父 (father) as an example. When handwriting Japanese characters like this, start at the top, as the normal rules dictate. Draw the short right-to-left diagonal, then the short left-to-right diagonal (the top two that don’t cross). Next comes the bottom of the character, following the same pattern.
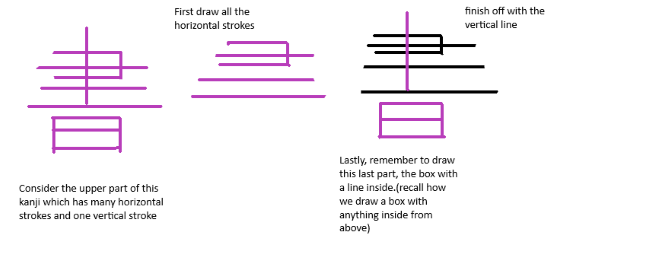
Handwriting Japanese Letters Rule 7: Strokes That Cross Through Many Other Strokes Come Last
Some kanji have lots of horizontal strokes intersected by a vertical stroke. In these situations, the stroke that crosses through all the others goes last. 事 (to do) is a great example of this. See the vertical line? That goes after all the little horizontal ones when you write Japanese letters like this.
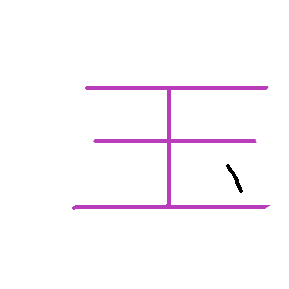
Here is another example;
Handwriting Japanese Letters Rule 8: Dashes and Dots Last
Usually, little flourishes like dashes and dots go last in stroke order. However, there are two exceptions to this rule. The first one happens when a kanji with a dot goes inside another kanji. Even though the dot marks the last stroke of that part, it might not be the final stroke of the whole kanji.
Take the kanji 国 for example. Remember it from earlier? The dot marks the last stroke of the kanji 玉, which on its own means ball.
Because of the enclosure rule we talked about earlier, the bottom stroke of the box/mouth is the last stroke of the entire kanji.
The second exception occurs when the dot is at the top. In this case, you should write the dot first to follow normal top-to-bottom stroke order when handwriting Japanese characters.
Handwriting Japanese Letters Rule 9: Write Kanji in Sections
Complex kanji are often composed of simpler components known as radicals. Remember 瞬 (matataki), or twinkle, from earlier? The best way of remembering the kanji with simpler components, is to approach it one radical at a time, usually starting from the top-left radical and moving towards the bottom-right.

Each time you start a new radical, reset your writing rules just for that specific part. Think of each section as its own kanji that you need to write, and then put them together. So, for 瞬, start with the leftmost character for eye, move over to the spiky top radical to the right, then draw to the character for evening, and finish with the radical in the bottom right corner. Ta-da! We did that in the twinkle of an eye!
Remembering the Kanji Stroke Order and Pronunciation
Remembering the kanji stroke order while handwriting Japanese letters is crucial to writing legibly and also helps a lot with memorization. But it’s not enough to have pristine handwriting: you also have to start remembering the kanju pronunciation.
Getting Japanese pronunciation right ensures you’ll be understood when you talk, which is kind of the point of learning a language! As Japanese phonetics are quite different from English, the earlier you start thinking about this, the better. Speechling can help you with that.
Speechling helps you master pronunciation with thousands of listen-and-repeat exercises featuring native speakers. If you're feeling adventurous, you can answer a question or talk about a picture instead, or even get help from a native speaker in real time. As you practice writing more kanji and following these recommendations and using Speechling to guide you, you’ll get closer and closer to mastering Japanese. 頑張って!